はじめに
今回は、前回紹介したCloud9 IDEを使って、Windows Azure上で動作するNode.jsアプリケーションを開発してみたいと思います。前回、Cloud9 IDE上に作成したワークスペースをそのまま使います。初めて読まれる方は、連載第3回で作成したExpress.jsを利用したWebアプリケーションのソースコードをCloud9 IDEのワークスペースに上げた状態を想定していただけると良いと思います。
また、これまでデータベースはMongoDBを利用してきましたが、 Windows Azureストレージのテーブルに代替して、こちらもクラウドサービスを直接利用するように変更します。
Windows Azureにサインイン
Window Azureのサイトから、無料で試すことができます。Microsoftアカウント(旧Windows Live ID)でサインインすることで無料評価版が利用可能です。
今回は「Webサイト」というプレビューサービス上にNode.jsをデプロイして、そこから「ストレージ」サービスのテーブルにアクセスする流れになります。
Windows Azureストレージアカウントを作る
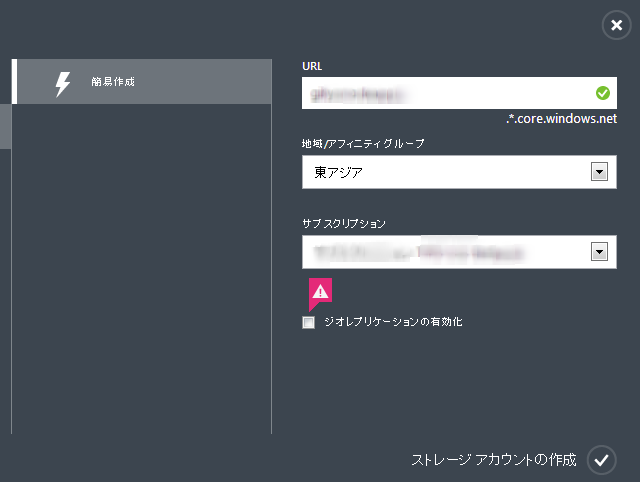
Windows Azureポータルにサインインして、左側のストレージをクリックします。さらに下部表示されるバーの [+新規] をクリックします。バーの内容が切り替わるので、新たに表示された [簡易作成] をクリックします。
図1 Azureストレージ アカウントの作成

図1が表示されるので、任意の値を入力後(ジオレプリケーションはサンプル利用なので無効にしています)、[ストレージアカウントの作成] をクリックします。画面のリストが更新されて、状態が「オンライン」になったら、追加された項目を選択すると、下部に [キーの管理] が有効になるのでクリックします。「アクセスキーの管理」ダイアログで [プライマリ アクセス キー] をコピーしてメモしておきます。
Webサイトを作る
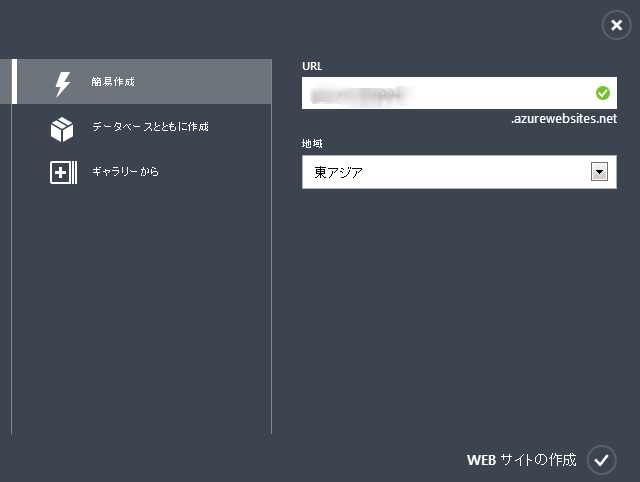
ポータルトップの左側の [WEBサイト] をクリックします。さらに下部表示されるバーの [+新規] をクリックします。バーの内容が切り替わるので、新たに表示された [簡易作成] をクリックします。
図2 Webサイトの作成

URLのプリフィックスに任意の値を入力して [WEBサイトの作成]をクリックします(図2)。
画面のリストが更新されて、状態が「実行中」になったら、名前の部分をクリックして詳細画面に遷移します。画面右側にある概要(図3)の [Git 発行の設定] をクリックします。しばらくすると画面が切り替わって、「Git リポジトリの準備ができました」と表示されます。その下の「リポジトリ」セクションに「GITのURL」がありますのでこれを後程使用します。
図3 WEBサイトのダッシュボードの概要

さらにこのGitリポジトリへのアクセスするためのアカウントにパスワードセットします。上部の [ダッシュボード] をクリックして戻り、概要(図3)の [デプロイ資格情報のリセット] をクリックします。
「新しいユーザー名とパスワード」ダイアログでパスワードをセットします。先ほどのGit URLの「<ユーザー名>@」を「<ユーザー名>:<パスワード>@」に置き換えたものをCloud9 IDEのGitにリモートリポジトリとして後で登録します。
表1 ストレージアカウント認証の環境変数
| AZURE_STORAGE_ACCOUNT | <ストレージアカウント名> |
|---|
| AZURE_STORAGE_ACCESS_KEY | <プライマリアクセスキー> |
|---|
上部の [構成] をクリックして、「アプリの設定」部分に、表1のように先ほどのストレージアカウント名とそのアクセスキーをセットします。
これにより環境変数を通して、Node.jsアプリケーションからAzureストレージにアクセスできるようになります。
Cloud9 IDEで開発する
Cloud9 IDEにサインアップして、前回のワークスペースを開きます。下部にあるコマンドラインにフォーカスを当てます。「npm install azure」と「npm install node-uuid」をそれぞれ実行します。前者はWindows Azure SDK for Node.jsはその名の通り、nodeからAzureのストレージサービスなどを利用しやすくするライブラリです。後者のnode-uuidはストレージのテーブルを利用するときにユニークIDの生成が必要であるため、そちらを簡単に行えるモジュールになっています。
Azure WEBサイトをターゲットに追加
続いて、先ほど作成したAzure WebサイトのGitリポジトリをリモートリポジトリとして追加します。AzureへのデプロイはもともとCloud9 IDEの機能としてありますが、Azure側のアップデートによりプロファイル設定がそのまま使えないため、今回は原始的な方法を紹介します。今後Cloud9 IDE側の変更で、再びHeroku同様にGUIから登録できるようになると思われます。
下部のコマンドラインから、「git remote add azure <Git URL>」としてGit URLにパスワードを入れた状態のURLを入力して実行します。これでリモートリポジトリazureとして、ここに“push”することで、Webサイトにデプロイすることができます。
Azureストレージに接続するように実装
MongoDBからAzureストレージを使うように書き換えてみましょう。app1/routes/main.jsを開いて、コードを以下のように書き換えます。
var uuid = require('node-uuid');
var azure = require('azure');

const TABLE_NAME = "table1";
const PARTITION = "partition1";

exports.index = function(req, res){
  var tableService = azure.createTableService();
  tableService.createTableIfNotExists(TABLE_NAME, function(err){
      if (err) {
        console.log(err);
        res.render('index', { title: 'Entry List', items: [] });
        return;
      }

      var query = azure.TableQuery.select().from(TABLE_NAME);
      tableService.queryEntities(query, function(err, entities){
          var items;
          if (err) {
            console.log(err);
            items = [];
          } else {
            items = entities;
          }
          res.render('index', { title: 'Entry List', items: items });
        });
    });
};

exports.form = function(req, res){
  res.render('form', { title: 'New Entry' })
};

exports.create = function(req, res){
  var tableService = azure.createTableService();
  tableService.createTableIfNotExists(TABLE_NAME, function(err){
      if (err) {
        console.log(err);
        res.redirect('back');
        return;
      }

      var newPost = {
        PartitionKey : PARTITION,
        RowKey: uuid(),
        text: req.body.text,
        created: new Date()
      };

      tableService.insertEntity(TABLE_NAME, newPost, function(err){
          if (err){
            console.log(err);
            res.redirect('back');
            return;
          }
          res.redirect('/');
      });
  });
};
それでは順に説明します。最初のrequireは追加した二つのモジュールのインポート宣言です。さらにAzureストレージのテーブルにおける、テーブル名とパーティションキーを定数として宣言しています。
次にexports.indexのインデックスページでの一覧表示部分の説明です。azureオブジェクトのcreateTableServiceメソッドでテーブルにアクセスするクライアントインスタンスを取得します。TableQueryオブジェクトはメソッドチェーンを使ってクエリを定義できるオブジェクトで、サンプルでは指定したテーブルからすべてを取得するものになります。そのクエリを引数にTableServiceのqueryEntitiesメソッドで内容を取得し、コールバックで画面内容を更新しています。
続いてexports.createのフォームから入力されたテキストをテーブルのエンティティに追加する個所です。insertEntityメソッドの引数にエンティティのJSONを渡して呼び出せば、追加できます。エンティティにはPartitionKeyとRowKeyが必須であり、それぞれテーブルの構成に関わるものです。今回のサンプルではPartitionKeyは固定、つまり同一パーティションに書き込み、RowKeyはnode-uuidの機能であるユニークID生成関数uuidで都度セットしています。
上記のどちらも、createTableIfNotExistsメソッドをまず呼び出しているのは、その名の通りテーブルがない場合は作成するという手順を挟んでいるからです。
Azure Webサイトへのデプロイ
下部のコマンドラインから「git add .」と「git commit -m “changed db from mongo to azure table.”」をそれぞれ続けて実行して、変更内容をコミットします。
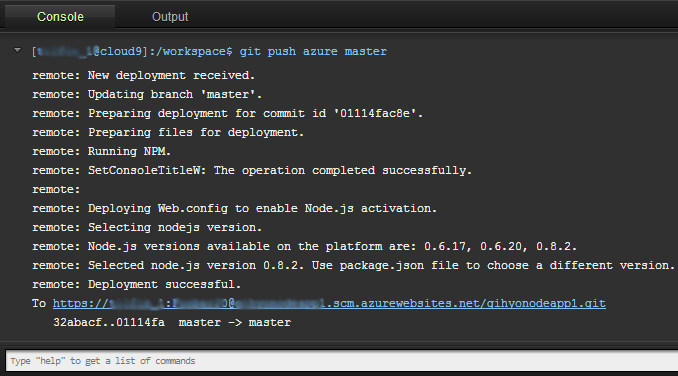
図4 Azureへのデプロイ時のコンソール

さらに「git pull azure master」を実行すると、AzureのGitリポジトリに反映されると同時に、Webサイトに自動的にデプロイされます(図4)。
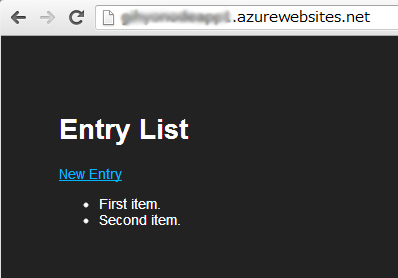
図5 AzureでのNode.jsの実行結果

AzureポータルのWEBサイトの一覧でURLをクリックすると、Azure上で動作するNode.jsアプリケーションにアクセスできます(図5)。
最後に
Cloud9 IDEとWindows Azureという開発および実行環境がクラウド上だけに閉じた状態で、Node.jsアプリケーションを制作する例を紹介しました。
長らく続きました本連載も、今回で最後となります。Node.jsや関連するクラウドサービスの利用に際して、少しでも助けになれば幸いです。


